|
The above diagram was written by Paddy Hine when a Flight Commander on 93 Sqn and
Brian Butterworth kept Paddy's handwritten notes. This particular brief was obviously given on the DFCS course as the base is West Raynham. Paddy is leading and the other members of the formation are all well known fighter pilots of the time who were either course students or DFCS staff.
BATTLE FORMATION
 The aim of flying in Battle Formation is to maximise the width of the formation so that the outer wing men can reduce the blind spot behind each aircraft. The outer wing pilots can cover the rear of the formation and their opposite number on the other side of the formation. Inevitably it constrains the manoeuvrability of the formation somewhat and decreases the tactical flexibility of the Leader. On a high level fighter sweep the pair elements would be stepped up down sun, and turns would generally be made in 90 degree increments whenever possible so that in 4 ship formations the second pair has to cross over to the other side and thus fly the same distance as the lead pair during the turn. A 180 degree turn would mean a double cross-over. A "hard turnabout" could also be called, and this would be done without any cross-overs. It would mean a momentary loss of rear cover as the elements went through the line astern positions, but was the fastest way to turn the formation towards a menacing threat. Often, an inwards turnabout would be more effective in dealing with an imminent threat from the rear. Low level Battle Formation is much more streamlined and swept back as the Leader will usually have to turn a lot more to follow the terrain. Both of these formation manoeuvres require lots of team work and practice. Examination of the average Squadron Monthly Operations Report F540 will show how Battle Formation was practiced very frequently. It was a skill which required regular practice. For example, after a month of gunnery at Sylt, one of the first exercises that was on the programme when they got back to Jever was - Battle Formation. The aim of flying in Battle Formation is to maximise the width of the formation so that the outer wing men can reduce the blind spot behind each aircraft. The outer wing pilots can cover the rear of the formation and their opposite number on the other side of the formation. Inevitably it constrains the manoeuvrability of the formation somewhat and decreases the tactical flexibility of the Leader. On a high level fighter sweep the pair elements would be stepped up down sun, and turns would generally be made in 90 degree increments whenever possible so that in 4 ship formations the second pair has to cross over to the other side and thus fly the same distance as the lead pair during the turn. A 180 degree turn would mean a double cross-over. A "hard turnabout" could also be called, and this would be done without any cross-overs. It would mean a momentary loss of rear cover as the elements went through the line astern positions, but was the fastest way to turn the formation towards a menacing threat. Often, an inwards turnabout would be more effective in dealing with an imminent threat from the rear. Low level Battle Formation is much more streamlined and swept back as the Leader will usually have to turn a lot more to follow the terrain. Both of these formation manoeuvres require lots of team work and practice. Examination of the average Squadron Monthly Operations Report F540 will show how Battle Formation was practiced very frequently. It was a skill which required regular practice. For example, after a month of gunnery at Sylt, one of the first exercises that was on the programme when they got back to Jever was - Battle Formation.
We were very lucky on 93 Squadron to have the quality of Flight Commanders in Chris Stone and Paddy Hine. Chris came to us as A Flight Commander from being one of the founding staff of the Day Fighter Combat School (DFCS) at West Raynham in the UK. He introduced a well structured briefing routine where everything necessary for the sortie was covered consistently and to the same standard. It had not always been so and the standardisation between the senior leaders on the squadron was often poor as they had their own ways of doing things and as a junior pilot one had to learn several different techniques. Chris's briefings, straight from DFCS, introduced stability and excellent guidance for budding formation leaders. As a result the standardisation was so good that if there was an operational scramble with no time for briefing, we were so drilled in standard operating procedures (SOPs) that we knew what to expect.
Phase Briefs are very detailed at the beginning of these exercises on the Squadron. After everyone had done a few sorties of any particular phase, and the leader was satisfied with the competence/experience of his formation members, then some of the standard procedures could be briefed simply as "SOP". On the DFCS course each student usually only got to brief one sortie as the leader on each Phase, and so this had to be thorough for a good rating.
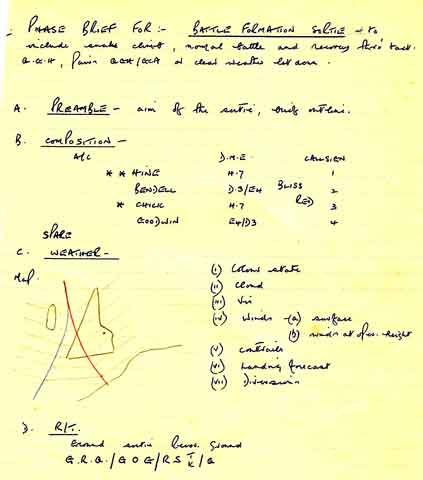
This is the first of six pages. The comments in red are not part of the briefing:
Phase Brief for: BATTLE FORMATIONSORTIE and toComments:
include snake climb, normal battle and recovery thru' tact"tact QGH" involved the second pair following
Q.G.H., Pairs QGH/GCA or clear weather let down.10 secs behind the lead pair and angling 10°
away from the inbound turn, then doing their
own GCA as a pair
A. Preamble - aim of the sortie, quick outline.
B. COMPOSITION -
a/cD.M.E.CALLSIGNThe a/c will be filled in on information from
** HINEH.71the Sqn. Ops. Room on the a/c state.
BENDELLD.3/E4BLISS2The Ldr No. 1 and Dep Ldr No 3 have their
* CHICKH.7RED3DMEs on home base H.7 The wing men on
GOODWINE4/D34convenient DMEs that will give cross fixes.
SPAREHine and Chick were the students, Bugs Bendell and
Dave Goodwin were DFCS staff,
C. WEATHER -
Map(i) Colour state.
Hand drawn map or (ii) Cloud.
latest met chart available.(iii) Vis.
In the example above(iv) Winds -(a) Surface
West Raynham is the dot(b) Winds at oper. height.
in East Anglia. The red line(v) Contrails.
is a warm front with(vi) Landing forecast.
a cold front to the left(vii) Diversions.
lying down the Irish Sea.
D. R/T.This shows the frequency changes that will be
Ground Sortie Recov. Ground.called on the ground, during the sortie, for
G.R.Q. / G.O.G. / R.S.T. / Q.recovery and back on the ground.
K.Note G=DFCS Ops; R= Military ATC area,
West Raynham was Eastern Radar. Q=Airfield
local control; O=GCI control; S=Airfield
Approach Control used for QGH and the pairs split between T and K for GCA talkdown. Hunter F6 had 2 VHF R/T 10-channel boxes, (Click to see Item 32 handily just behind the throttle), A to J and K to T. Choosing the best frequency pre-sets helped frequency changes in the air, in cloud, formating on the leader with little chance to look down. Note K and T, the GCA frequencies, were at either end of the second box which helped switching to them, in cloud on final GCA. J was always the emergency frequency 121.5 and the last place on box 1.
End of Page 1.
(Thanks to Chris Stone for being the Technical Advisor for this series.)
|